UTM URLs are a great way to measure the effectiveness of your digital marketing campaigns. UTM tagging allows you to see which channels are driving traffic, how much traffic is being sent, what keywords are driving the most conversions, and more!
In this blog post, we'll show you how UTM tagging works and provide an example of UTM tags in action to help you get started.
What is UTM tagging?
UTM (or Urchin Tracking Module if you prefer its proper name) is a protocol that allows you to track, more accurately, how people are arriving at your website. UTM tagging is the process of adding campaign-specific variables to your destination URLs to measure their performance within Google Analytics.
Where do UTM tags go?
UTM tags need to be added to the destination URL of a link, not just in the source code on your website.
For example, let's say you produced a whitepaper that might be interesting to your target audience. You might decide to promote that using some paid advertising on LinkedIn to drive traffic and leads via a landing page on your website.
At the end of the campaign, you'd like to know how much traffic and conversions the campaign generated. UTM tagging helps you get that data via Google Analytics with ease.
Rather than just pointing your LinkedIn ads to a page on your website (making it more difficult to measure), UTM tagging helps to assess the performance of your campaigns by putting data into different categories and buckets.
A simple UTM tag for our imaginary LinkedIn whitepaper campaign might look something like this:
https://www.yourwebsite.co.uk/utm_source=linkedin&utm_medium=social& utm_campaign=linkedin%20whitepaper
Let's break this down piece by piece.
Source (utm_source) - The channel or advertiser through which the traffic is coming, such as "LinkedIn," "Energy Voice Banner," or "email."
Medium (utm_medium) - The type of marketing campaign, such as "cpc," for cost per click, "email," or "social."
Campaign (utm_campaign) - The specific name of the campaign, such as "LinkedIn Whitepaper"
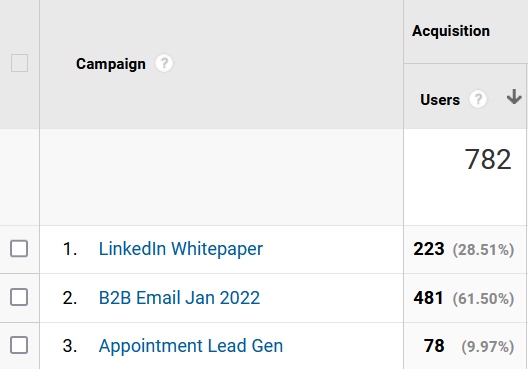
Once you've set up your URLs with UTM tags and your campaign starts driving traffic, you'll be able to visit the Acquisition > Campaigns section of your Google Analytics account to measure the performance of your campaign.
Here you'll be able to see how many unique visitors the campaign delivered, sessions, average duration, and so on. And, if you've set up conversion tracking, you'll be able to see how many conversions the campaign generated, too.

If you're running the same campaign across multiple platforms or channels, simply change the source and medium accordingly, leaving the campaign name the same. Then you'll be able to visit the Acquisition > All Traffic > Source/Medium section of your Google Analytics account to better understand how your campaign is performing with different channels, platforms, and advertisers.
How to set up UTM tagging
Google offers some documentation on how to create your own UTM tags, but the fastest way to generate UTM tags is to simply use a tool to help you.
We highly recommend this Campaign URL Building Tool which simplifies the process.
Simply input your URL, source, medium, campaign name, and so on, and the tool will generate your fully qualified URL, ready for you to start using.
We hope you've found this blog post useful and will help to make your next digital marketing campaign a roaring success!

